Shooting the Night Sky
The most common photographic subjects in the night sky, other than the Moon, are the Milky Way, and Star trails.
Shooting the Milky Way
When you photograph the Milky Way you are shooting a type of image called "star points". Most of the discussion below applies both to shooting star points, and shooting the Milky Way.
- You need a dark sky. If you live in a city you'll need to travel well outside of it before shooting. Even small cities can ruin a good night sky image. For example, the White Pocket is over twenty miles west of Page, Arizona but the glow of Page is still evident if you shoot the eastern sky from the White Pocket. You should wait until at least 80 minutes after sunset before shooting the Milky Way, and should end 80 minutes before sunrise.
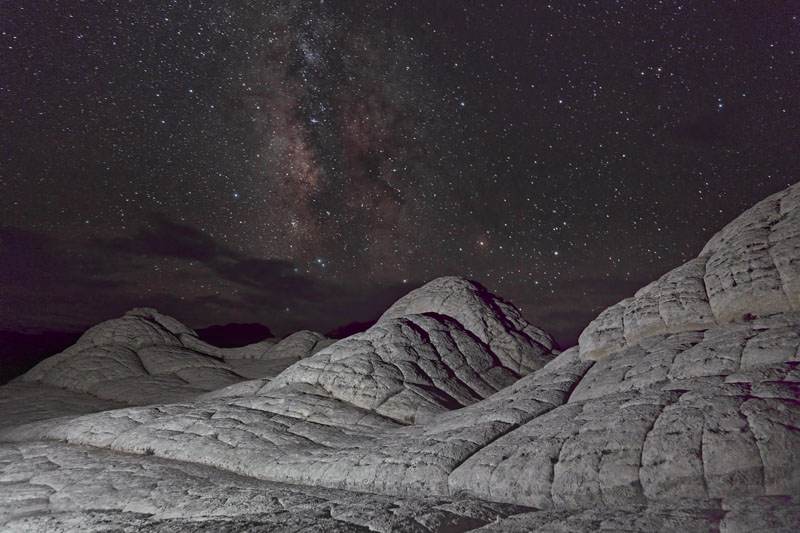
- The Milky Way is largely in the southern sky. Here's a shot taken at the White Pocket facing south. There were some clouds near the horizon. The foreground was light painted with a flashlight.
- The Milky Way photographs better in the summer months of June to September than in the winter. In the winter the galactic core is below the horizon in the northern hemisphere. The program Stellarium can be used to view the location of the Milky Way. Stellarium runs on Windows PCs, and also OS 10. To best determine where the Milky Way will be set the Milky Way brightness to 5.0 in the Sky and Viewing Options window (F4 brings it up). Mobile versions of Stellarium are available for both iOS and Android and, once installed, do not require access to the cloud. PhotoPills, available for iOS only, is also an excellent Milky Way shot planner.
- When shot planning using Stellarium look for times when the Great Rift (aka Cygnus Rift) is above the horizon. The Great Rift is where the Milky Way appears to split into two pieces, the dark area below the split is caused by a series of non-luminous dusty clouds.
- You need a cloudless sky or at least a sky that is clear in the direction of the Milky Way. Ideally there should be little dust or haze. In August it often rains in the desert late in the day. This serves both to reduce haze/humidity and to wash dust from the air. August is an excellent time to shoot the Milky Way. Mid - Late June is also a good time for shooting the Milky Way as June is the driest month of the year, and the full Milky Way is visible near the horizon a few hours after sunset.
- During late June consider shooting a Milky Way panorama two hours after sunset. The Milky Way extends to nearly 240 degrees then, so use the widest lens possible. During the taking of the panorama the stars will move quite a bit. The stitching program PTGUI adjusts for this when it sets the control points, so the stars will still be sharp. The foreground however will be blurred at the seams.
- A moonless sky is desirable. You can use sunrisesunset.com to see whether the Moon will be out when you are shooting. If the Moon is out, its light will totally wash out the Milky Way.
- Shoot with a wide angle lens to capture as much of the sky as possible. 14 - 24 mm is a good starting point on a full frame camera. The lens should be fast so that many stars appear in the final image. If you have an f/2.8 lens or faster use it. f/4 lenses can be used but are best for low resolution or web images. At f/4 you will have to adjust the ISO to uncomfortable levels (ISO 6400). I mostly use the Nikon 20mm f/1.8 lens and the Sigma 24mm f/1.4 when shooting the Milky Way. While you can compensate for a slower lens by raising the ISO, this will increase the noise in the blacks of the night sky.
- 30 seconds is a rough maximum exposure time for wide angle lens. A better rule of thumb is:
Max shutter speed = 500 seconds/(full frame equivalent focal length)
For example, if shooting with a 24mm lens on a FF camera the maximum shutter speed would be 500/24=21 seconds. If you shoot longer, the movement of the stars in the night sky will result in more motion blur. A more accurate shutter speed calculator can be found towards the bottom of the webpage here. Use of this calculator for a Nikon d800 (36 Mpx), 24mm lens, and pixel tolerance of ten gives a 23 - 26 second exposure time. Some other maximum exposure times are: at 14mm 31-40 seconds, at 20mm 26-30 seconds, and at 28mm 20-23 seconds.
- ISO should be set to yield an EV value of roughly - 7. This would correspond to shooting at ISO 1600 and f/2 for 30 seconds. Alternatively review the histogram of the sky and make sure that the histogram curve is neutral or exposed to the right. If your histogram shows underexposure I suggest you increase your ISO in camera rather than increasing the exposure in post.
- Some recommended exposure times follow:
Focal Length Aperture ISO Time 14 2.8 3200; 36 20 1.8 1600 25 24 1.4 1250 21 28 1.8 1600 18 35 1.4 1600 14 - The foreground will normally be in silhouette unless you light it with a flashlight. The shape of the foreground is important but the color/contrast isn't when shooting silhouettes, Good foregrounds include arches, joshua trees, saguaro cactus, hoodoos, etc. Since you will be shooting wide open you need to watch your depth of field.
- Bring a small flashlight so that you can check the settings on your camera, and be careful not to change them accidentally while you are getting ready to shoot. A red filter on the end of the flashlight will help preserve your night vision.
- Scout your subject in advance; it can be very difficult to compose and focus in the dark, even with a flashlight. Mark the subject's position with a GPS. Mark your car's position with a GPS as well. On a moonless night navigation is very difficult; even things that are obvious in the daytime become impossible to find at night. For example, I did a night shoot at Toadstool Hoodoo last year and had difficulty following the trail back, even though the trail is very clear in the day and I had a strong flashlight.
- When hiking a flashlight may work better than a headlamp, especially if there are bugs. I'd rather have bugs flying around my hands than my head! When you are shooting a flashlight is definitely better than a headlamp.
- Lighting the foreground can be done in two ways. The easiest way is to shoot two images, one at dusk or before the moon sets or rises, and one at night. Combine them by taking the foreground from one image and the night sky from the other. You'll need to be able to select the foreground in Photoshop to use this technique. After layering, adjust the exposure of the foreground picture to suit.
- A flashlight or spotlight can be used to light the foreground. You can get various battery powered spotlights from amazon.com. These can be used to "light paint" distant objects. Try a one million candlepower torch to start. For nearer objects a diffuse flashlight can be used. When light painting, be sure to literally paint the foreground and make sure not to dwell in one place too long. Dwell somewhat longer on distant objects than nearer ones. Diffusers can be made from filter sheets used with studio or video lighting.
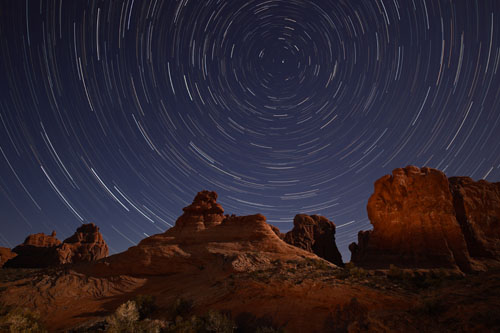
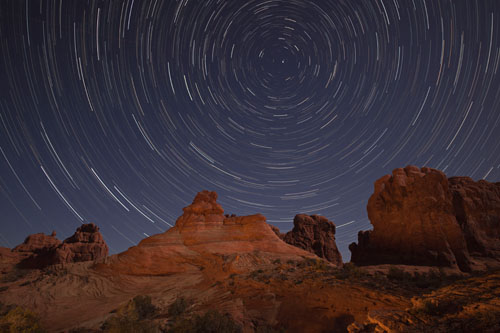
- When the foreground can be easily selected I normally prefer the composite approach above to light painting. It has a higher success rate, and also often creates a side lit foreground. When you light paint you usually have a front lit fairly flat foreground. The following images were shot at Arches National Park. The left image uses the composite approach, the second, light painting. I prefer the side lighting in the first.
- Light painting works well when you want to totally control the angle of light, want to better separate the foreground from the background, or have the background totally dark. This technique could be used at The Hooters in Coyote Buttes North. During daylight hours The Hooters blend strongly into the background which limits their appeal. At night a flashlight would effectively isolate them from the background. The Hooters are best shot from the south so they make a good subject for star trails.
Star trails
Shooting star trails is very similar to shooting star points. Because of the earth's rotation, each hour the stars in the night sky move by 15 degrees. In practice this means you'll need to have the shutter open for at least an hour to get a good star trail picture. If there is a full moon in the sky (or even a quarter moon) leaving the shutter open this long will result in most of the stars being washed out. So a work around was developed: when the Moon is out, leave the shutter open for at most 30 seconds and then immediately take another exposure. Repeat for at least the next hour or so. Over an hour you would get 120 exposures.
There are many programs on the web that can then be used to combine the pictures into a single image, or even a video. The programs all work in the same way: they layer the images and combine them so as to always take the brighter pixels from each image in the result. I use the program StarStaX which is freeware and can be downloaded here . This program takes as input a collection of either jpg or tiff files. I use tiffs. I shoot in raw mode, and then adjust the exposures uniformly to get as many stars as possible in the image. Finally I convert the raw files to tiffs and input them in StarStaX. When using StarStaX set the blending mode to Gap filling using Edit Preferences. If you've shot a dark frame check "Subtract Dark Images" as well.
In the northern hemisphere star trails are best shot to the north. This generates very nice circles about the North Star which can be viewed as an extension of the Earth's axis. Shooting to the east or west will generate long arcs, and shooting to the south (which should be generally avoided) will generate flat lines or very wide arcs.
The North Star always points to true north, as opposed to compasses which point to magnetic north. To shoot effective star trails you need to be able to find the North Star. First locate the Big Dipper which most people can easily do. Then extend the outer edge of the dipper as follows:
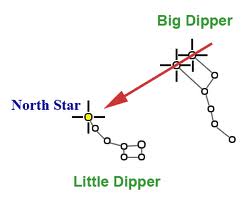
The brightest star in the Little Dipper is the North Star.
When shooting star trails use similar rules as for shooting star points: shoot wide (24mm or wider if possible), f/2.8 or faster, and ISO 400 and 30 seconds maximum exposure if the Moon is out. Shoot for at least an hour beginning at least 60 minutes after sunset and ending at least 60 minutes before sunrise. Shoot in continuous mode, or use a remote timer to get the necessary exposures. Test focus and exposure carefully before beginning your series.
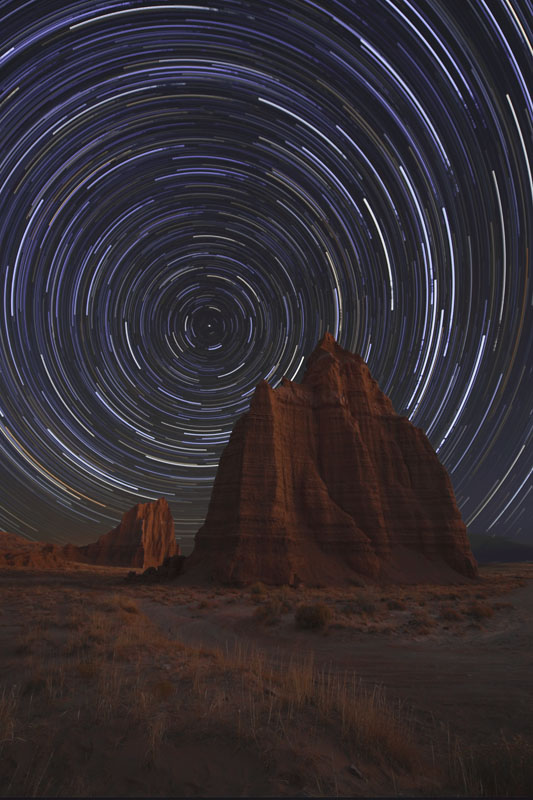
Shooting towards the north produces the best star trails. Good subjects include the north entrance to The Wave, The Second Wave, Sand Cove, The Hooters, and Fatali's Boneyard, all of which are best shot to the north or northwest! The Temples of the Sun and Moon in Capitol Reef are also good subjects. Here is a sample image; the Temple of the Moon is in the foreground.