Shooting the Moon
The Full moon - A full moon is, to the camera, just like any other front lit object in bright sun. This has several consequences:
The sunny 16 rule says that proper daylight exposure for well lit subjects under a clear sky is to set the shutter speed to 1/ISO at f/16. This will display the Moon as it really is. Since it is a rock, the Moon will appear as roughly middle gray. The Moon normally appears to us to be quite bright so you need to adjust your exposure; overexpose by a stop or so. Thus we have the "Looney" (for Lunar) 11 rule: at f/11, shutter speed should be 1/ISO.
When the Moon is partially covered by clouds or is low in the sky you will need to increase your exposure. If you can't remember these rules just expose for something well lit in the foreground and, either in Photoshop or otherwise, increase the brightness of the Moon until it appears to be white. You should also bracket.
The full moon is a front lit subject. When shooting it you are in between the Sun and the Moon. The Earth is almost exactly between the Sun and Moon when there is a full moon (it is exactly between the sun and moon during a lunar eclipse). The full moon rises and sets 180 degrees from the Sun. So at sunset the Moon will be low in the eastern sky, and at sunrise, low in the western sky. On most days of the month you cannot see the full moon during the daylight hours. A waxing (increasing in size) nearly full moon can be seen low in the eastern sky just before sunset. A waning nearly full moon can be seen setting low in the western sky at sunrise and will not be visible at sunset.
The sunrise/sunset tables on this site include Moon phase and moonrise/moonset times for selected locations. You can visit sunrisesunset.com to get times for anywhere in the world. You can get the azimuth (direction), altitude, and percent illuminated of the Moon at http://aa.usno.navy.mil/data/docs/AltAz.php. The same information is available using an application called The Photographer's Ephemeris (TPE) which is available on Windows, Mac, IOS, and Android. See photoephemeris.com.
- Example: You want to shoot Top Rock Arch in Coyote Buttes North with the full moon appearing inside the arch and the arch lit by the Sun.The arch faces west so you plan to shoot at dawn. This means you need to get a permit for Coyote Buttes North one to three days after the Moon is full. You plan to go in April 2012. Go to sunrisesunset.com or use my site to determine that the Moon is full on April 6, 2012. So you should plan to shoot on April 7, 8, or 9. Suppose you get a permit for April 8. From sunrisesunset.com the Sun rises at 6:01 AM on April 8 in Page, and the Moon sets at 7:05 AM. You'll have at most an hour when the Moon is above the horizon and the foreground is lit by the Sun. Here is a screen print from TPE centered on Top Rock Arch:
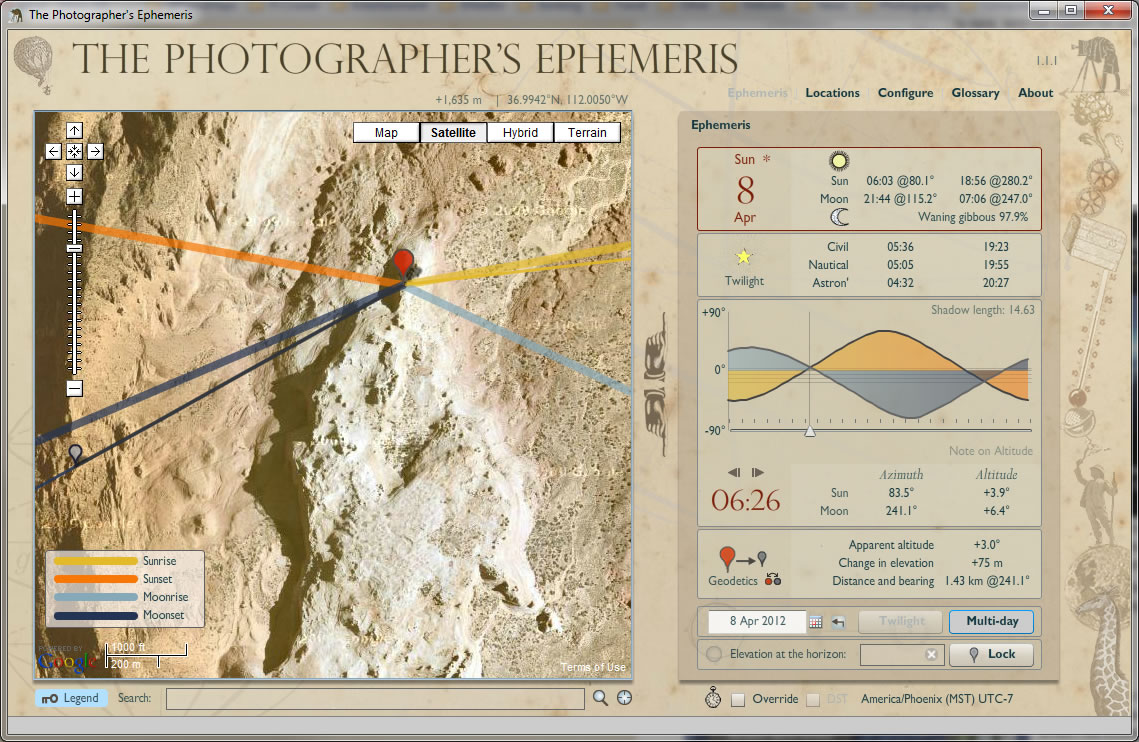
There is a lot of good information here. Note that I have assumed you would shoot about 25 minutes after sunrise at 6:26. At 6:26 the Sun should be about 3.9 degrees above the horizon so the arch should be lit. I haven't been to Top Rock Arch recently but I expect that it would be lit even earlier since it is at a high point. The thick yellow line on the image is the Sun's direction at sunrise; the thin yellow line is the Sun's direction at 6.26 AM.
At 6:26 the Moon will be 6.4 degrees above the horizon and is in the direction of the thin dark gray line which goes through The Notch. By moving the small gray marker you can get the apparent elevation of anything that might come between you and the Moon. I moved the gray marker to the area near The Notch and slightly varied its location until I reached the highest elevation. From the "Geodetics" section of TPE you can see that the The Notch is a bit higher than Top Rock Arch, about +75 m. The apparent altitude is +3.0 degrees. Since the Moon's altitude is 6.4 degrees above the horizon at 6:26AM, the Moon should be about 3.4 degrees above The Notch and you should be able to shoot it though Top Rock Arch.
Alternatively, and less precisely, you could go to http://aa.usno.navy.mil/data/docs/AltAz.php. to get the direction and altitude of the Moon during the hour before the Moon sets. Here's a sample of the output:
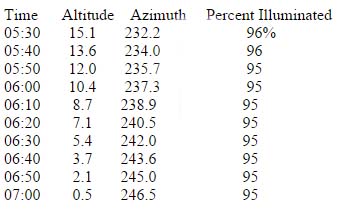 From the table the Moon will be roughly WSW (240 degrees) when it sets, 95% illuminated, and within 10 degrees of the horizon. This method is less precise since it doesn't take into account the topography of the area. If The Notch was a bit higher it would be possible that it would block the Moon.
In practice there is a problem with both methods: local topography does not always appear on Google maps. Having been to Top Rock Arch, I know you cannot get very far from the arch when photographing it. A normal to short telephoto lens is the best you can do. As a result, the full moon will be very small inside the arch.
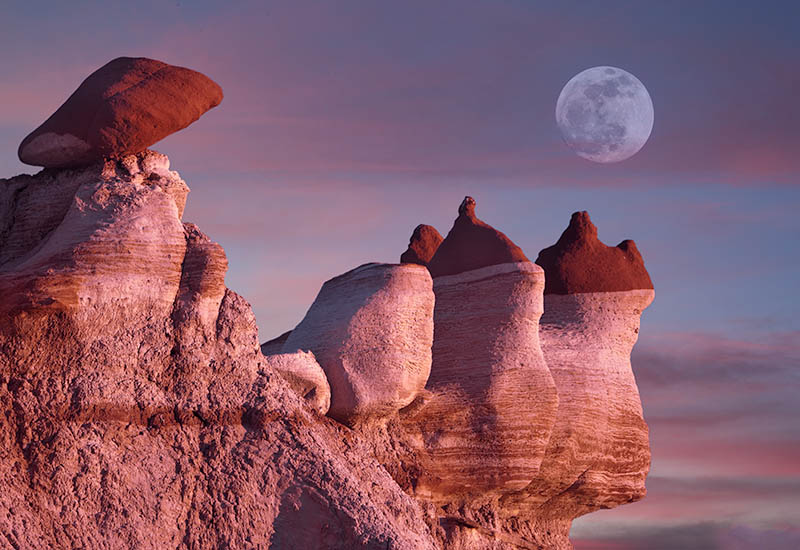
- The best subjects for full moon photography face either east or west, and can be shot effectively with a long telephoto lens. One good subject is the rock formation in Blue Canyon, seen here simulated at sunset (full disclosure - this is a composite!)
Other observations
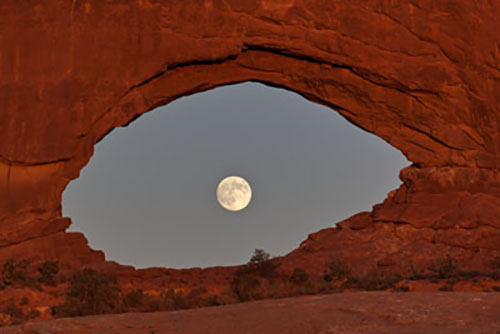
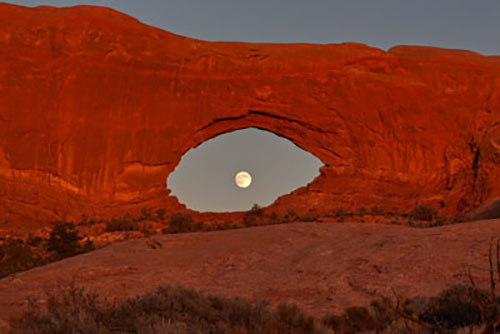
- If possible, the Moon should be shot with a telephoto lens, 200mm is good and 300-500 mm better. Here are two examples (not composites) of the full moon appearing in the North Window in Arches NP at dusk. The first is shot at 300 mm, and the second at 135 mm. Both are taken from the same spot.
- Composites - It is easy to paste a full moon into an image. This can improve the balance or interest of the picture and I have no problem with this practice. Keep the following in mind when pasting. First, a full moon shot in the daytime will never be very high in the sky. Second, when the Moon is full it is front lit. Other subjects in the frame that face you should also be front lit. You cannot have a side lit subject facing you and a full moon in the picture at the same time without it being a composite.
- The exposure rules above are for the full moon in the daytime hours. If you shoot the Moon at night, set the exposure using the Looney 11 rule as a start, and bracket. If the Moon is near the horizon or is not full, you may need to increase the exposure slightly to get a properly exposed Moon. The foreground will be in silhouette. Good foregrounds include arches, joshua trees, saguaro cactus, hoodoos etc. The white blossom of the saguaro cactus is the state flower of Arizona.
- It is possible to use the Moon as a light source. Under a full moon, the light is much dimmer than the Sun's and the light falls off very quickly when the Moon is not full. If you are going to shoot landscapes under a full moon use as fast a lens as possible and a stationary camera (tripod) and subject. At f/2.8 and ISO 200 you need an approximate exposure time of 30 seconds to get a reasonably exposed foreground lit by the full moon under a clear sky. Use this as a starting point, review your histogram, and adjust as necessary.
- If you want to include both the Moon and a moonlit foreground in the same picture you will need to use HDR with a large spread in exposure, or you will need to paste in the Moon from another exposure.